|
|||||||
 |
|
|
LinkBack | Thread Tools | Display Modes |
|
#851
 29-12-2018, 10:49 AM
|
|||
|
|||
|
__________________
Doing it for all the wagons out there 
|
|
#852
29-12-2018, 12:13 PM
|
|||
|
|||
|
__________________
Doing it for all the wagons out there
|
|
#854
29-12-2018, 01:11 PM
|
|||
|
|||
|
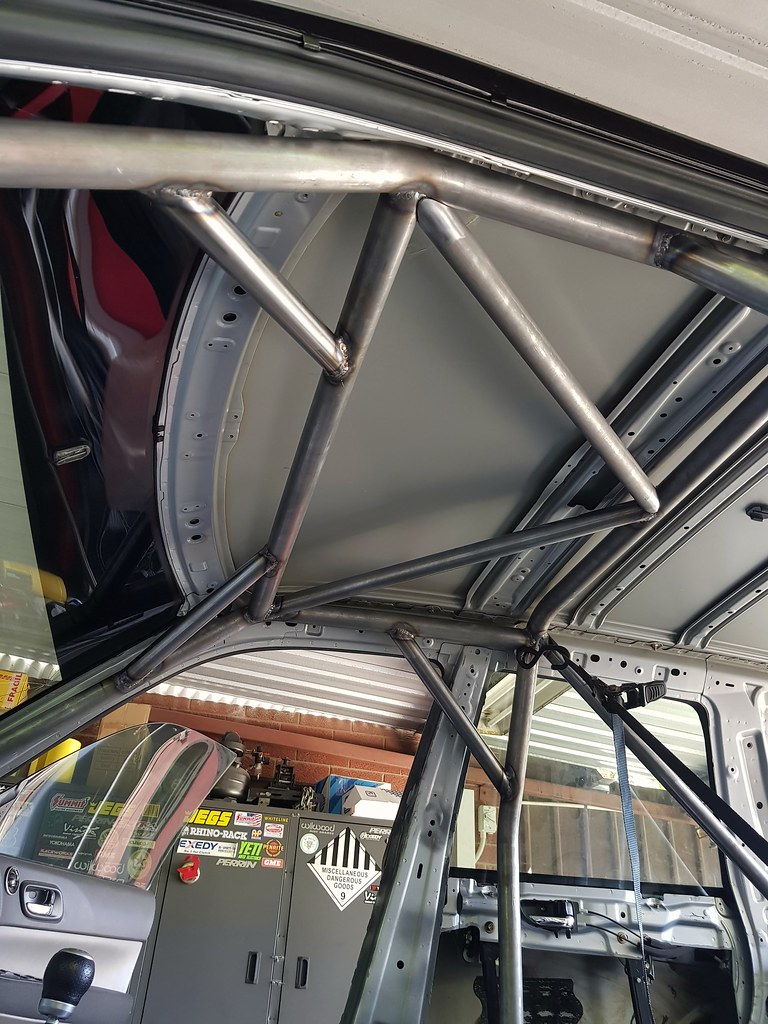
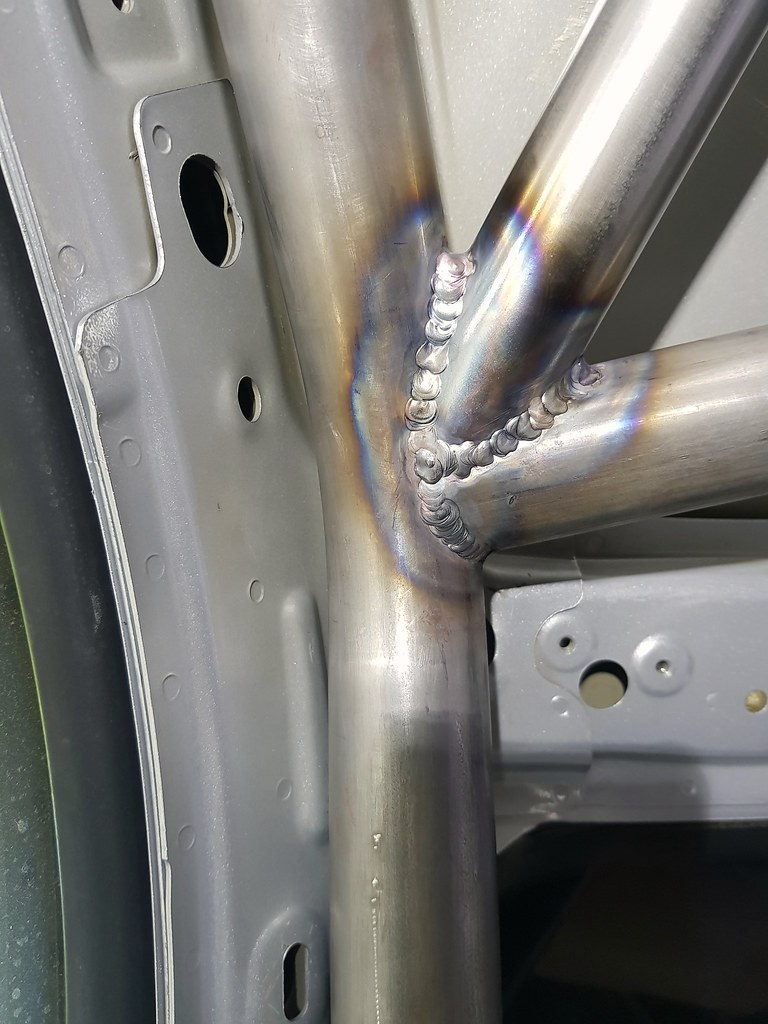
Yeah. All built following CAMS guidelines.
Material thickness and grade is CAMS recommended. Arrangement and placement of bars is all listed in CAMS book. Mounting plates are bigger than CAMS required. Should be all sweet. Only thing Im a bit questionable about is my welds. And the brace between the main loop and the lateral side loops. The book says cannot be placed more that half the member length. And if you measure mine on the INSIDE of the member length, to the INSIDE of the next node, then its a fraction over half way. But if you measure CENTERLINE of the tube to CENTERLINE to CENTERLINE of the main hoop, then its ok. The guidelines dont specify whether they consider total length, or centerline to centerline length. In either case, the difference is like 20mm.
__________________
Doing it for all the wagons out there
|
|
#855
29-12-2018, 08:01 PM
|
||||
|
||||
|
Awesome work mate. Any progress with engine yet?
Are you attaching any of the bar work to the shell of the car or leaving as is? Like the roof line, b-pillars and a-pillars.
__________________
Bye bye betty blue. Hello F6. Last edited by nick73; 29-12-2018 at 08:27 PM.
|
|
#856
29-12-2018, 09:57 PM
|
|||
|
|||
|
Quote:
When it blew up last year. I bought a whole buch of parts. Super duper fancy pants shopping list. I bought a Manley billet 75mm 2L crank. (De-stroker) +2mm Manley turbo tuff rods. Manley high comp pistons. ARP case bolts. RCM 14mm studs. GSC 282 cams. Ferrea +1 comp plus valves. GSC Beehive springs. Tomie Berylium valve seats. RCM billet timing kit. Billet vernier cam wheels. Pink STi belt. RCM gaskets. Basically the full monty. I even commisioned RCM to build me a custom 5 stage drysump. (This was before they released the 5 stage kit to the public.) I tooled up to do the engine build myself. And bought about $3-4k worth of tools. Like mics, dial bore guage, torque wrenchs, ring compressors, spring compressors, dial indicators, deck bridges, con rod scales, bolt stretch gauge, Full kit basically. I ported and polished heads myself, and had the beryllium valve seats cut in. I bought about $500 worth of new shimless buckets and got valve lash set perfect with new valves. Plan was to build a mega motor with all the fruit myself, de-stoker 2.35L. I did some paid corses on engine building and read and watched and learnt as much as i can on the subject. With the engine case - Last year, i got it sent to have CDB, pinned main tunnel and 14mm studs done here in perth. It was supposed to be ready for me before x-mas holiday 2017. So i could assemble it over the end of year break. It took another 8 or 9 MONTHS!!! for it to have the work completed. It was a painfull wait. When I recieved it back, the CBD work was amazing. But, there was alot of damage along the parting face of the case halves. Presumably because it been kicked around the shop for the better part of a year. It looks like it has been stored and transported with the parting face down, collecting dents and dings along the way. The CBD and pinned main tunnel was very well done. And the honed cylinders were very nice aswell, and measured up pretty damn good. And the deck surface was very nicely cut. But careless handling of the block had left it scared up. One dent actually mushroomed metal from the parting face INTO the main bearing tunnel. And someone had a go at the parting face with a sanding block and some wet and dry, presumably to try and smooth out some of the big dents. (I have photos of all this.) I decided to have a line hone performed, so that the parting face could be cleaned up with a skim cut. But mostly because i am using ARP case bolts, which are known to deform the case / main tunnel when torqued up, and ARP specifically call for a line hone in the instructions. I asked around, and most people who use ARP bolts here dont torque them fully, because they know they deform the case, and instead of line honing, they just dont fully tighten the bolts. It sounds dodgy, but this is is how it is around here... But i figured it would be best to have themain tunnel line hone done to clean the damge on the parting faces, and take full advantage of the ARP bolts higher clamp load. So I took it to another WA shop in Pinjarra who has the tooling to do the hone. And guess what. They did the hone, but left 2 of the main bolts loose when they honed it. I knew they fucked up as soon as i un-did the bolts. Because the last 2 were loose (main bearing #5). I un-wound them and took photos and it was clear the bolts were never done up, because they were brand new ARP bolts, and they didnt have any wear on them at all. All the rest of the torqued up bolts did have visible wear on them. And that conclusively proves they had forgot to do the bolts up. Not only did they not do the bolts up, they clearly would not have done them up in correct sequence either, as the instructions clearly say the bolt order, and call for 60ft lb at 3 equal stages of torquing. If they had of forgot the last 2 bolts, then in theory, they should have atleast been at 40 ft lb. But they were barely fingur tight. So not only did they forget to do the bolts up, they didnt even read the fucking instuctions. Fucking retards!!! So i sent them the photos of the loose bolts as proof. Then torqued it up and measured the bore with my bore guage, which was totoally out of spec. It measure about 0.0015 under lowest allowable tolerance. I took it back, and they re-skimmed the parting face, and re-did the hone, and got all the horizontal measurements in spec. But there was about 0.0025 out of round on the first and last main bearing bore. (The vertical measurement was about 0.0025 bigger than the horizontal measurement) To put that into perspective. The out of round was more than the bearing clearance max tolerance. Like nearly double what the max tolerance is!!!!!! Because the case has been skimmed twice now. And the tunnel is so far out of spec, the only chance of saving the case is to bore it to oversize bearings. There is only one company in the entire world that make oversize bearings like that for Subaru. And they only make 1 size bearing in oversize bore spec. Plus i still need to find a shop who is capable of doing the line bore job. And this is probably the hardest thing.... I got so fucking pissed off with the multitude of fuck-ups. And have lost all faith in WA machine shops. No one gives a fuck about damage, or delays, or is competent enough to read instructions or count to 10 when when torquing bolts. All they want is your cash. The entire industry is a fucking disgrace. I wanted to build the engine myself, so I had the last say about how it was done, and know that no dodgy "she'll be right" sort of shit went on. And i still get fucked over by machinists. The only shop Ive had good work done is from Neil at Engine Shop. But he is a small shop, and only has so much equipment. He doesnt have CNC equipment or line boring equipment as far as i know. He did a great job on the cylinder honing and deck surface cut. That was really nice work. He did an ok-ish job on the berylium valve seat cut / install. (Valve installed hieght was only just in range to fit with OEM range of buckets, any lower or higher and i would be forced to use shim under buckets to set lash correctly). But that it is a bit of an odd ball job which has its difficulties. Galloways were the fuckwits who botched the main tunnel line hone. Total incompetence from thier part. Im just glad i was able to pick it up. Imagine if they were building you an engine, and they FORGOT to do up the main bolts... I dont know for sure, but from what I have been told, the delays with the CNC close decking were because of Highspeed engineering. I didnt go to them direct. The job was outsourced through a 3rd party. But it came back 9 months later than anticipated, and had dents all over it... I decided to put the engine build on hold while i let my blood pressure normalise. And instead do the roll cage myself. And that is where we are today. /rant.
__________________
Doing it for all the wagons out there Last edited by Bram; 29-12-2018 at 11:41 PM.
|
|
#857
29-12-2018, 10:14 PM
|
|||
|
|||
|
Quote:
Yes, i will be linking the cage in as much as i can. The CAMS books says you can tie in at more places than the basic mounting points for the main loop, front pillars and rear back stays. So i figure the more the merrier. I will be gussetting the A pillars to the front lateral bars. I have a hydraulic hole punch and a set of really nice dimple dies. So I can do a fancy dimple die gusset along the A piller. I will tie the B pillars to the small brace bar that goes between the main loop and the front lateral loops. This lines up perfectly with where the OEM seatbelt upper mount would have gone. So it should be a relatively strong part of the car. I will also tie the door bar into the B pillar. It needs to run right past it, so I should be able to gusset/link it in relatively easy. In the photos, you can see I have got plates welded in at the base of A pillar that line up with where the dash bar goes. So I can tie it in there really well too. That also looks like a really strong area of the shell, so it will be good to tie in there i think. I am also thinking of tie-ing in the front strut towers aswell. But havent committed to it 100% yet. I like the idea of linking the front towers in, but its quite a difficult job to line it all up for the transition through the firewall/gutter. I also want to tie in a vertical bar from the center of the main loop stright down to the trans tunnel. This will give a 3rd leg for the main hoop so to speak. And i will basically have a 8 sided X brace in the middle of rhe main loop, which should be hella strong. I have also fully stitch welded the floor of the cabin, from inside and also from below. I will eventually stitch weld the front of the shell up to the front towers. And also stich weld up the pillars etc too.
__________________
Doing it for all the wagons out there Last edited by Bram; 29-12-2018 at 10:40 PM.
|
|
#858
29-12-2018, 11:20 PM
|
||||
|
||||
|
Fuck dude sorry to hear about your block, it's a stressful process regardless but that is piss poor.
Cage looks mint so far!
__________________
Bye bye betty blue. Hello F6.
|
|
#859
29-12-2018, 11:36 PM
|
|||
|
|||
|
Quote:
I was planning on doing a big surprise reveal to PWRX with the sexy new motor and 600+ hp. But it seams like its cursed. I think the best coarse of action is to just buy a new subaru short motor and try again. Ill still send the current block off for line bore, and if its salvagable, then thats good, (i could even use the new crank and rods from the new short and build a spare) if not. We move forward. Loosing the block sucks. Esecially after all the machine work done to it (CNC CDB, pinned mains, cylinder hone, deck cut, line hone.) Its a fair whack of coin to flush down the toilet. (And a year of my life waiting for it to come back to me) But thats WAY cheaper than running it and then fucking a billet crank, fucking some turbo tuff rods, plus putting metal through the 5 stage dry sump, ruining a set if gaskets and bearings and everything else. Plus the time and effort of building it and installing and tuning it... sometimes better to cut losses and chalk it up to learning. You learn who you can trust to do good work, and who you can trust to do shit work.
__________________
Doing it for all the wagons out there
|
|
#860
03-01-2019, 12:33 PM
|
||||
|
||||
|
Very sorry to hear about your engine building experiences bram.
The cage is looking great, i for one am looking forward to seeing it done and racing, as the ole tale says good things take time Will you resort to engine building/CNC/CDB work over east ? 230kw 420nm GC8 on E85
|
|
| Tags |
| sled, yeti |
|
|


 636Likes


 Linear Mode


